Deploy VMware SaaS Connectors
You can install a VMware SaaS Connector using an installer OVA in your VMware environment, on a vCenter or ESXi host in your data center that has access to your data sources and meets the SaaS Connection system and firewall requirements. Once deployed, each SaaS Connector acts as a virtual machine in your data center.
For better performance and redundancy, we recommend deploying at least two SaaS Connectors for each SaaS Connection in your data center. To add (or remove) a SaaS Connector, see Manage User-Deployed SaaS Connections.
Cohesity can concurrently back up individual VM disks using multiple SaaS connectors, leading to faster backups. Cohesity determine the concurrency based on various factors, such as disk size and the workload of the SaaS connectors. Cohesity cannot recover individual VM disks using multiple SaaS Connectors because VMware does not support it.
All the data that a SaaS Connection handles, from your sources to the cloud storage where your backups reside, is encrypted in flight and at rest.
Create VMware SaaS Connection
To create a VMware SaaS Connection:
-
In Cloud Protection Service, navigate to Settings > SaaS Connections.
-
Click New Connection.
-
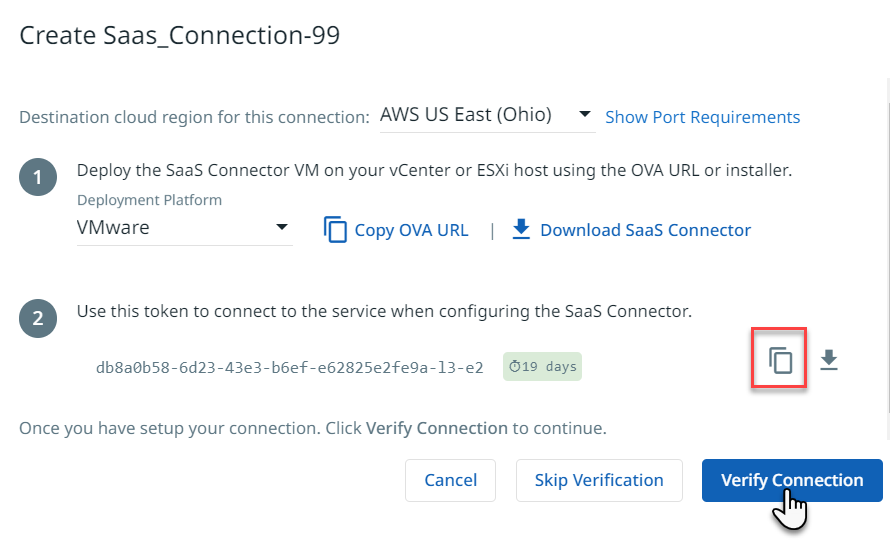
In the Create SaaS Connection dialog, select the following:
-
From the Destination Cloud Region for this Connection drop-down, select a region for your data backups.
-
From the Deployment Platform drop-down, select VMware.
-
To deploy the SaaS Connector in your data center, do one of the following:
-
Copy the OVA URL.
-
Download the OVA file.
-
-
-
Click Skip Verification or Cancel. After deploying the SaaS Connector OVA, you will need to verify the connection later in Step 12.

-
To deploy the SaaS Connector OVA in your data center:
-
Log in to your vCenter host.
-
From the Hosts and Clusters tab in the vSphere Web Client, right-click on any cluster that can host your VM and select Deploy OVF Template. The Deploy OVF Template wizard opens.
-
On the Select an OVF template page, do one of the following and click Next:
-
Paste the link of the OVA file you copied in Step 3 (a) in the URL field.
-
Select Local file, click UPLOAD FILES, and browse to the location of the OVA file you downloaded in step 3 (b).
-
- On the Select a name and folder page, enter the following and click Next:
In the Virtual machine name field, enter a unique name for your SaaS Connector.
In the Select a location for the Virtual Machine field, select where your VM should reside from the displayed list of inventory locations.
-
On the Compute Resources page, select a compute resource for the SaaS Connector VM and click Next.
-
On the Review details page, verify the SaaS Connector information and click Next.
-
On the Configuration page, verify SAAS-CONNECTOR is selected and click Next.
-
On the Select storage page, select a datastore with at least 181 GB of free disk space and click Next.
-
On the Select networks page, select a destination network and click Next. You can select VLANs from both the DataNetwork and the SecondaryNetwork fields. The Data Network is used for communication with Cohesity SaaS, and the Secondary Network is used for communication with your data sources. Based on your requirements:
-
To deploy the SaaS Connector on a single network, select the same VLAN in both DataNetwork and SecondaryNetwork.
-
To deploy the SaaS Connector on a dual network, select different VLANs in DataNetwork and SecondaryNetwork, respectively.
-
The SaaS Connector must have dual IP addresses if your data sources are in a private non-routable VLAN.
-
Once you have deployed the SaaS Connector on a single network, you cannot modify the SaaS Connector to use a dual network or vice versa.
-
-
-
On the Customize template page, enter the network settings: Network IP Address, Network Netmask, and Default Gateway. If you have selected a different VLAN for the secondary network, enter the Network IP Address, Network Netmask, and Default Gateway for the secondary network, as well. Click Next.
-
To set the network settings using static IP addresses, manually enter the details in the respective fields for both DataNetwork and SecondaryNetwork.
-
To set the network settings using DHCP, leave the fields blank in both the DataNetwork and SecondaryNetwork sections.
-
Data Network and Secondary Network must be configured using the same network configuration method. That is static IP addresses or DHCP.
-
-
Review the summary on the Ready to complete page and click Finish.
-
Once the VM is created, power it on.
After it boots, the services in the SaaS Connector VM (including the UI) can take 4-5 minutes to start.
-
-
Enter the IP address of the SaaS Connector VM in the address bar of your browser and click Enter.
-
On the SaaS Connector's User Interface, enter "admin" in the Username and Password fields to log into the SaaS Connector.

-
On the next screen, you are prompted to change your password. Change your default password and log in again with your new password.
-
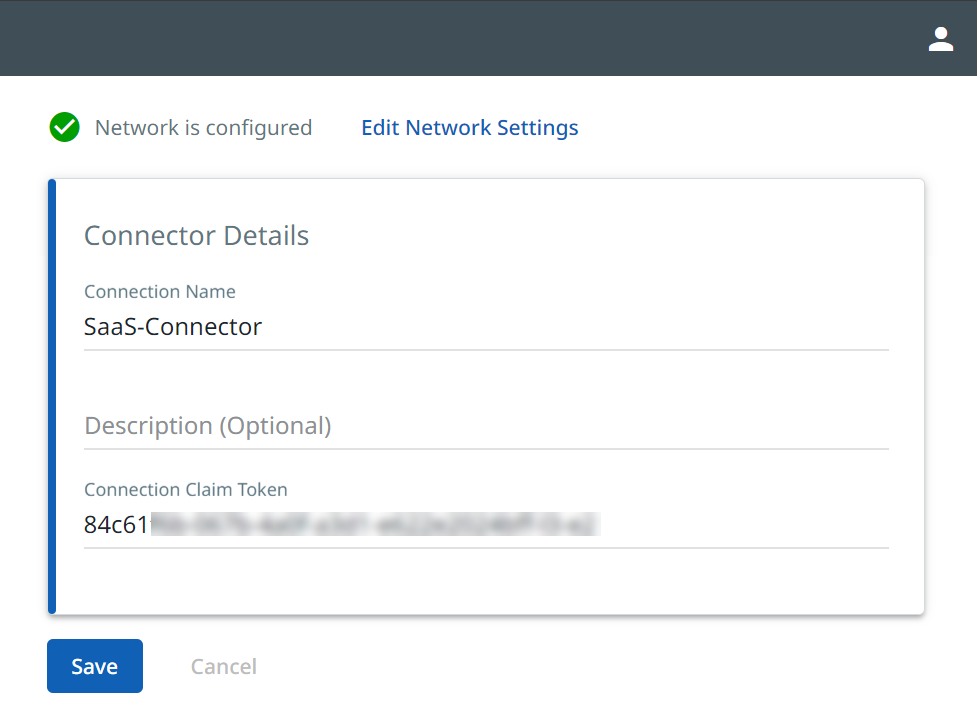
Verify the network configuration settings, make necessary changes, and click Continue.

- In Cohesity Cloud Protection Service, copy the Connection token from the Create New Connection dialog.
- On the SaaS Connector page, paste the Connection token in the Connection Claim Token field and click Save.
It can take another few minutes for the SaaS Connector to authenticate to the Cohesity Cloud Protection Service.
-
Once the SaaS Connector authenticates successfully, return to the Create New Connection dialog and click Verify Connection.
Next > Your new VMware SaaS Connection is available under Use Existing Connection to register your VMware sources.
