Manage User-Deployed SaaS Connections
To optimize performance, we recommend that you use at least two SaaS Connectors in each SaaS Connection you create, and that you have one SaaS Connector for each 160 VMs or 16 TB of source data. (If you have more VMs, we recommend that you stagger their first full backups.)
You can also manage the network bandwidth consumption of your backup and recovery tasks in your SaaS Connections.
Cloud Protection Service can concurrently back up individual VM disks using multiple SaaS connectors, leading to faster backups. Cloud Protection Services determine the concurrency based on various factors, such as disk size and the workload of the SaaS connectors. Cloud Protection Service cannot recover individual VM disks using multiple SaaS Connectors because VMware and HyperV do not support it.
Add SaaS Connector
To add a SaaS Connector to an existing user-deployed SaaS Connection:
-
In Cloud Protection Service, navigate to Settings > SaaS Connections.
-
Click the Actions menu (⋮) next to the SaaS Connection and select Download Installer to save the OVA to your data center.
-
To deploy the OVA or VHD, follow the instructions in Step 6 in the respective SaaS connector topics for VMware and HyperV.
-
Back in the SaaS Connections page, click the Actions menu (⋮) next to the SaaS Connection again and select Connection Token. In the dialogue, click the Copy to Clipboard button.
-
Browse to the SaaS Connector IP and log in as admin/admin. On initial login, change the default password and log in again with your new password. Enter the Connection Token and common configuration settings and click Save.
-
Once the SaaS Connector authenticates successfully to the Cohesity Cloud Protection Service, click the Expand (v) button next to the SaaS Connection to confirm that the new SaaS Connector is listed.
To add more SaaS Connectors to the same SaaS Connection, repeat the steps above.
Remove SaaS Connector
To remove a SaaS Connector from one of your SaaS Connections:
-
In Cloud Protection Service, navigate to Sources and click into a source that uses the SaaS Connection.
-
Click the Connection tab.
-
Under Connection Details, click the Actions menu (⋮) next to the SaaS Connector and select Remove from Connection.
The SaaS Connector is removed from the SaaS Connection. If other healthy Connectors remain in the SaaS Connection, it will continue to function over those Connectors.
Modify SaaS Connector Network Settings
After you have deployed your SaaS Connector, you can use the SaaS Connector UI to:
-
Modify the SaaS Connector’s existing network configuration.
-
Change the network settings of the SaaS Connector from manual (static IP addresses) to DHCP, or from DHCP to manual configuration.
To modify the SaaS Connector network settings:
-
Using a browser, type the IP address of the SaaS Connector VM and log in to the SaaS Connector UI.
-
On the SaaS Connector UI:
-
Select DHCP to change the network configuration from static IP addresses to DHCP, then click Continue.
-
Select Configure Manually to change the network configuration from DHCP to static IP addresses, then click Continue.

-
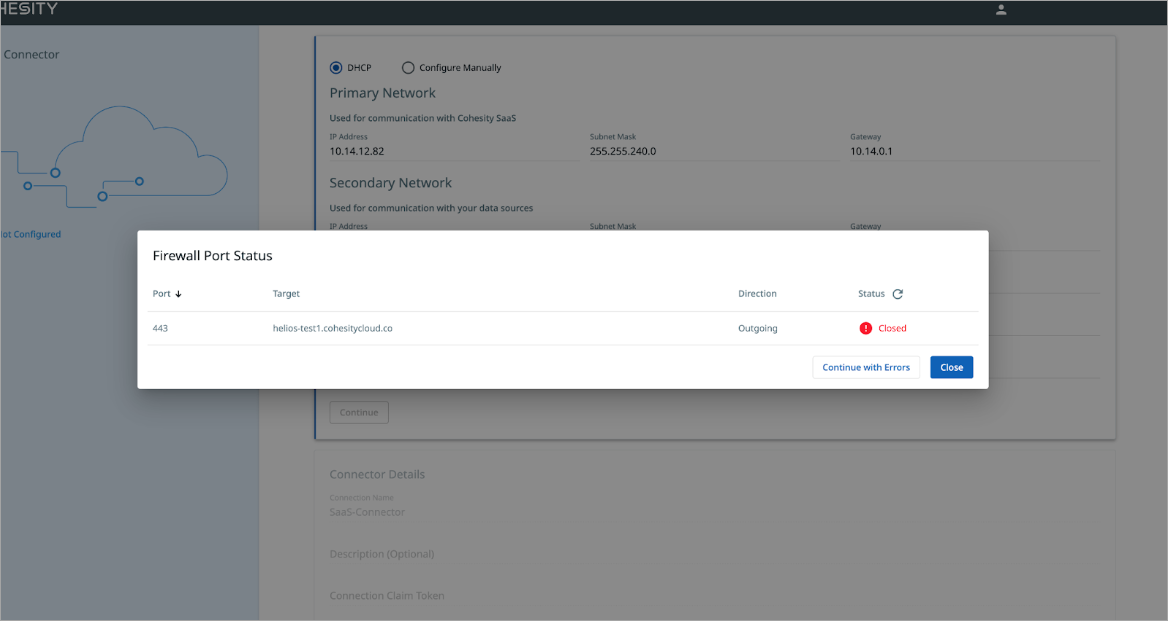
-
The SaaS Connector verifies the network connection to the Cohesity SaaS service using the primary network. Click Close if the verification is successful or if errors are found during the verification process. You can also click Continue with Errors to ignore the errors and continue using the SaaS Connector.