Register VMware Sources
To start protecting your VMware VMs, you need to register your data sources.
To connect with sources in your data center, you'll need to use a SaaS Connection (or create one) to establish connectivity between the sources and the Cohesity Cloud Protection Service.
To register your VMware sources:
-
Ensure the VMware requirements, such as Software versions, Firewall Ports, and the vCenter user account role privileges, are met.
-
Navigate to the Sources page and click + Register Source in the upper-right corner of the page.
-
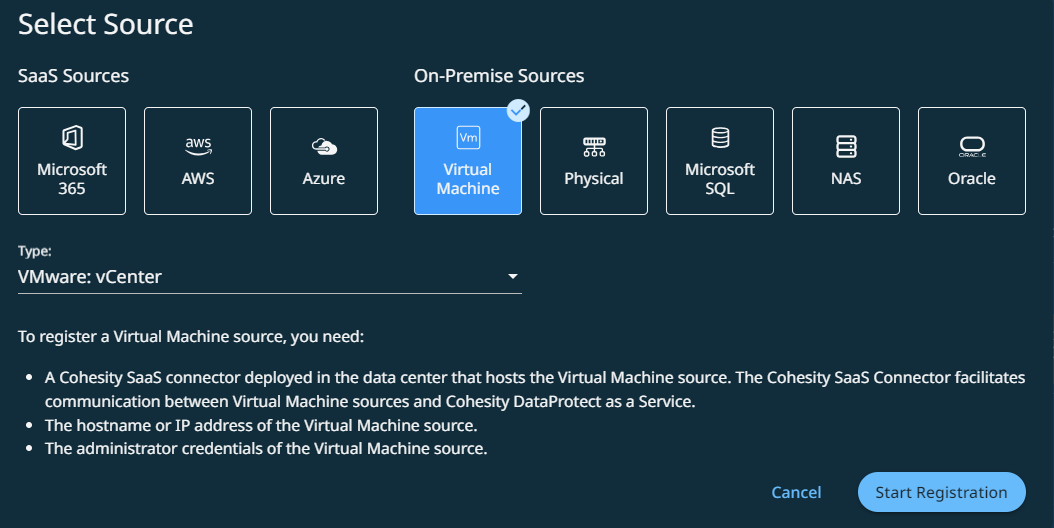
In the Select Source dialog box, select Virtual Machine.
-
In the Type: drop-down, select VMware: vCenter or VMware: Standalone ESXi Host and click Start Registration.

-
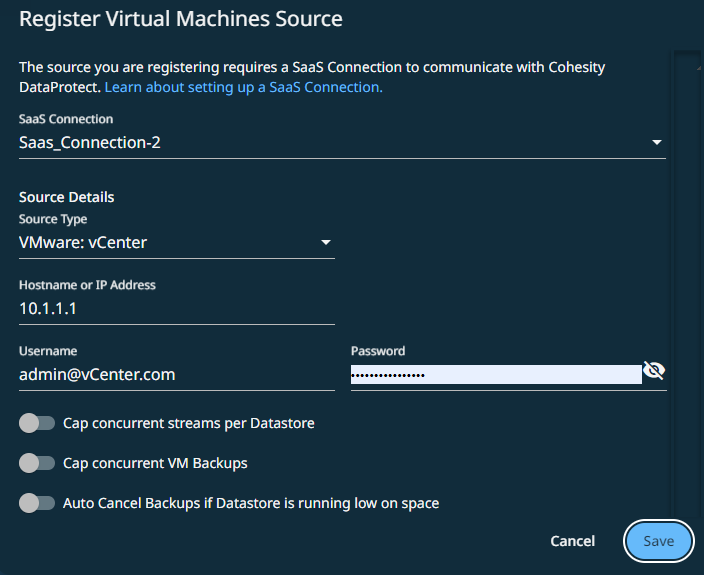
Select an existing SaaS connection marked as Unused, or click Create SaaS Connection and follow the instructions in Deploy SaaS Connector.

-
Click Continue.
-
Enter the Hostname or IP Address.
-
Enter the Username and Password.
-
Enter the following (optional):
-
Cap concurrent streams per Datastore. Turn this toggle ON and set the number of concurrent backup streams for each datastore Number of Streams field.
When registering a VMware vCenter, the value specified in the Number of Streams field will be applicable to all datastores within that vCenter. You can override this value for specific datastores after completing the VMware vCenter registration. When the registration is complete, Cohesity discovers all the datastores within the vCenter and displays them in the Add Datastore Override field. To override the global value, select a datastore, enable Cap, and enter the number of streams. If you disable Cap for a data store, the limit you set in the Number of Streams field will not be applied. The default limit set by Cohesity is applied instead.
-
Cap concurrent VM Backups. Turn this toggle ON, and the number of VMs concurrently backed up per vCenter in the Number of VM Backups field.
This field is not applicable if you register an ESXi host.
-
Auto Cancel Backups if Datastore is running low on space. Turn this toggle ON if you want to set the minimum free space that should always be available in the datastore. Once set, Cohesity automatically prevents backups from starting if the datastore does not meet this requirement.
Enter the minimum amount of free space required in either the GiB or % fields. For example, if you enter 10 in the % field, 10% of the datastore space is available at all times.
The percentage option is more flexible as it auto-adjusts when the datastore shrinks or expands, even if a VM has multiple data stores. For example, if two virtual VM disks reside in separate datastores of size 500 GB and 1 TB each, 10% of free space will apply to both the datastores.
-
Set Last Backup detail. For VMware vCenter only: Toggle this setting ON to set the last backup time and backup status for a VM in vCenter. These are published as custom attributes. By default, the option is turned OFF.
When a backup is performed on a vCenter with the feature enabled, the custom attributes "Last Cohesity Backup Attempt Time" and "Last Cohesity Backup Status" will be set or updated to reflect the backup time and status.-
Last Cohesity Backup Attempt Time - The exact timestamp when the last backup attempt succeeded.
-
Last Cohesity Backup Status - Status of the last backup for each VM.
When performing VM-based backups, if the backup is successful but has warnings caused by implicit fallbacks such as failure to utilize storage snapshots or issues with deleting the VM snapshot (which is a time-consuming operation), we will set the last backup status as 'Success' since the VM was successfully backed up. However, if there are errors or warnings due to explicit fallbacks (for example, transitioning from SAN to NBDSSL, or from app consistent to crash consistent), we will update the backup status to accurately reflect the error or warning.
-
-
-
Click Complete.
Next > You are now ready to protect your VMs.
