Protect Azure SQL Databases
Before you protect the Azure SQL databases in your Azure source, you must set up a SaaS Connection for each region under each Azure subscription in your Azure source. A SaaS Connection consists of one or more SaaS Connectors, which are VMs that act as data movers between your data sources and the Cloud Protection Service.
Once you set up a SaaS Connection, you are ready to protect the Azure SQL databases in the Azure source.
Set Azure SQL Server Credentials
For Azure SQL, you can set credentials at the Azure SQL Server level. This information is used to connect to the database during backup and recovery.
To set the database credentials:
-
In Cloud Protection Service, navigate to Sources, find the registered Azure source, and click on it.
-
Click the Azure SQL tab.
-
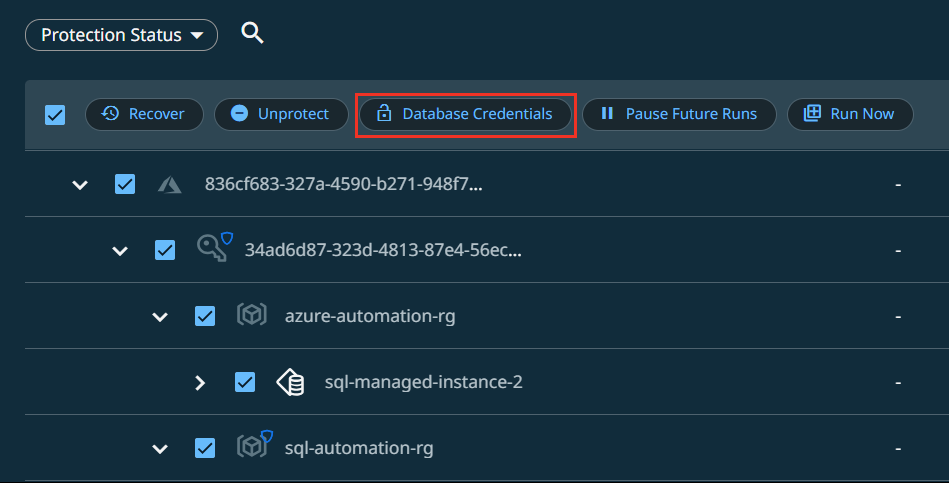
Click the checkbox next to the Azure SQL Server and click the Select All Child Objects option.

-
Click the Database Credentials button.
-
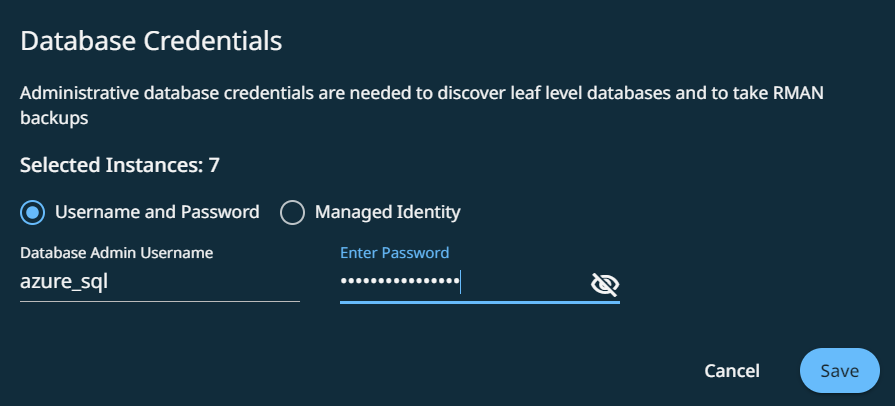
You can select one of the following options:
-
Username and Password - Provide the database admin username and password. These credentials are required for leaf-level databases. The account must have access to all databases within the SQL server.
-
Managed Identity - Uses the authentication automatically managed by Azure.
Ensure the following:
-
Managed Identity is provided during SaaS connector setup. If not, the managed identity must be added to the relevant Saas Connectors before performing protection using the managed identity method.
-
Managed Identity is configured on the SQL Server Microsoft Entra admin field, either directly or indirectly as part of a User Group (this can be helpful if other admins are also required).
-
When configuring the SaaS Connector that will serve the SQL Server, it has to be assigned a User Assigned Managed Identity. For more details, see Manage user-assigned managed identities.
-
If the SaaS connection has multiple connectors, all of them must be assigned the same Managed Identity.
-
The same Managed Identity must also be set as an Entra Admin for the SQL Server. For more details, see Microsoft Entra admin with a server in SQL Database.
-
For backup to be transactionally consistent, Cohesity backup creates a copy of the database and uses the copied database to perform the backup. For managed instances, instead of a copy, a new database is created by Azure recovery (native). The new database is created under the same managed instance so that the backup uses the storage and compute resources from the production-managed instance.
-
-
-
Click Save.
Add Protection to Your Azure SQL Databases
To protect your Azure SQL Server databases:
-
In Cloud Protection Service, under Sources, find the registered Azure source and click on it.
-
Click the Azure SQL tab.
-
Use the checkboxes to select the objects for protection. You can select the tenants
 , subscriptions
  , resource groups
  , or databases
  under them.
-
To protect all objects in the source, click the checkbox next to Object.
-
To protect all the child objects under the Azure SQL Server, click the checkbox next to the Azure SQL Server and click the Select All Child Objects option.
-
To auto-protect the Azure SQL Server, click the checkbox next to the Azure SQL Server object and select the Auto-Protect This Azure SQL Server option.
Object-level exclusion is not supported during Azure SQL protection.
-
-
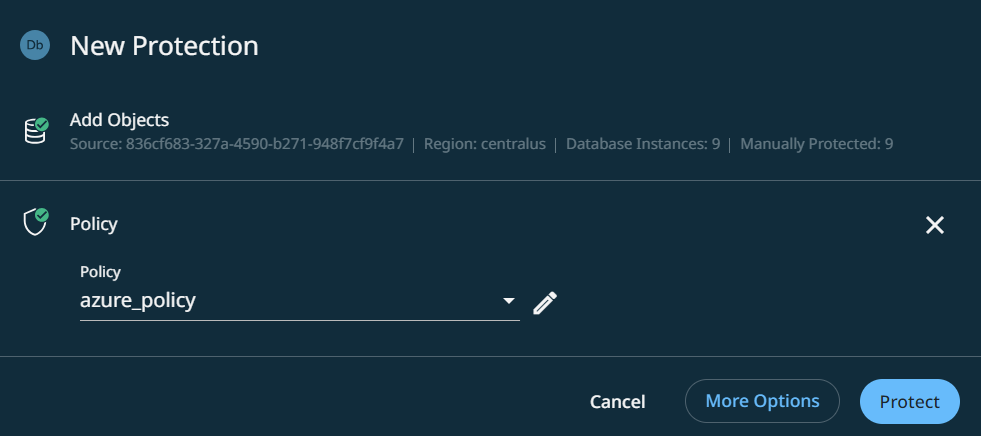
Click Protect.
-
Choose a policy to specify backup frequency and retention. If you do not have a policy, you can easily create one.
Periodic full is not recommended for Azure SQL since all incremental backups are converted to full backups. If periodic full is part of the policy, two full backups will run sequentially when new databases are onboarded.
-
To change or configure any of the additional settings, select More Options and perform the below steps, or else, click Protect.
-
Under Settings, edit the Start Time if necessary.
-
In the SLA field, define how long the administrator expects a protection run to take. Enter:
-
Full. The number of minutes you expect a full protection run, which captures all the blocks in an object, to take.
-
Incremental. The number of minutes you expect an incremental protection run, which captures only the changed blocks in an object, to take.
-
-
If you need to change any of the additional settings, click the down arrow icon next to Additional Settings and click Edit.
-
Click Protect.
You can monitor the status of the backup on the Activity page. Also, the Activity tab of a specific Azure SQL shows the history of all protection runs, including the one in progress.
Cloud Protection Service starts backing up the databases you selected.
Additional Settings
| Settings | Description |
|---|---|
| Copy Database |
Enable the Copy Database toggle button to make a copy of the database. Backing up a database in use may be transactionally inconsistent. To ensure transactional consistency, you must stop all transactions on the database before backup, or make a copy. Database recovery may not work if the backup is not transactionally consistent. For more details, see Copy a transactionally consistent copy of a database in Azure SQL Database and Microsoft backup limitations. |
| Copy Database SKU |
Specify the Stock Keeping Unit (SKU) details for the copy database. Select the SKU Name, SKU Tier Type, and Capacity. To get a list of valid SKUs for your subscription and region, use the following API: Location Capabilities - List By Location. The default setting is Hyperscale: Standard-series (Gen5), 4 vCores. |
| Temporary Database Disk Size | Provide the disk size (in GB) for the temporary disk used during backup. This field is mandatory for databases from Managed Instances (backups may fail if not set) and not required for databases in unmanaged SQL instances. |
| Pause Future Runs | Toggle on this option to stop protection runs from executing. Once you enable this option, no protection runs will be scheduled. |
| End Date | If you need to end protection on a specific date, enable this option to select the date. |
| Quiet Times | Available only if the selected policy has at least one quiet time period. Toggle it ON to specify that all currently executing protection runs should abort if a quiet time period specified for the protection starts. By default this toggle is OFF, indicating that after a protection run starts, it continues to execute even when a quiet time period specified for this protection run starts. However, a new protection run will not start during a quiet time period. |
Protect Azure SQL Databases in Bulk
To protect Azure SQL databases in bulk:
-
Click the Global Search box at the top or type an asterisk (*).
-
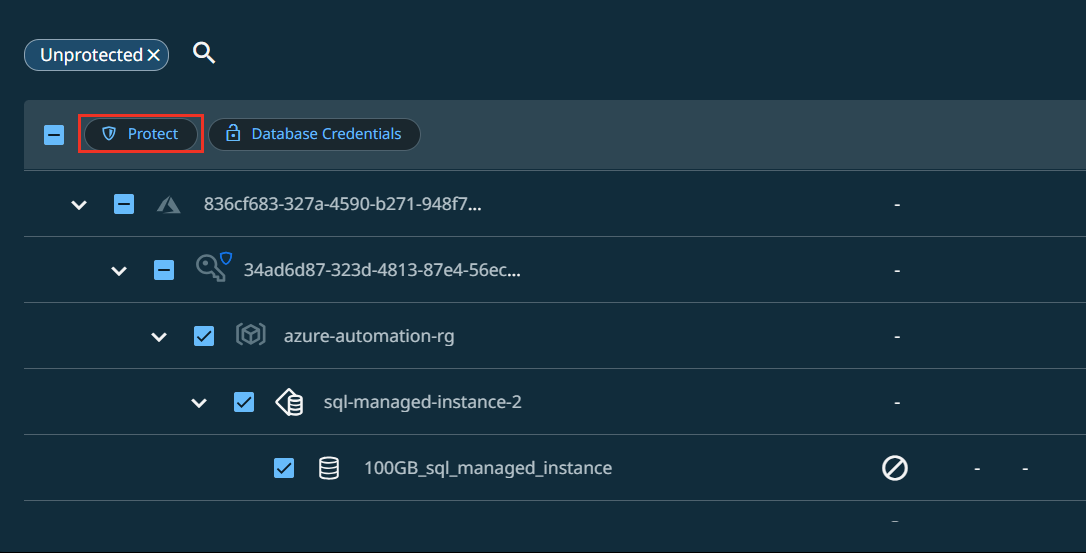
In the Filter by section, select Status as Unprotected, Type as Azure, and under Azure, select Azure SQL Database and click Protect.
-
You can also select the Status as Protected and Pause Future Runs, Edit Protection, Cancel Run, and Unprotect the protected databases.
Next > When the first protection run completes, you will be ready to recover your protected databases when and if you need to.
