Recover Your Amazon EC2 Instances
After you protect your Amazon EC2 instances, you can recover them to their original location or a new location using Cohesity Cloud Protection Service. Cohesity preserves the Instance Metadata Service v2 (IMDSv2) configuration of Amazon EC2 instances during recovery.
We recommend that you also review the Amazon EC2 Recovery Support Matrix and Important Considerations at the end of this article.
Recover Amazon EC2s to Original Location
To recover your protected Amazon EC2 instances to their original location:
-
In Cloud Protection Service, navigate to Sources.
-
Click the Source name.
-
Select Show All > Protected.
-
Use the filters, search box, and views to locate and select the Amazon EC2 instances you want to recover.
You can also use Global Search to locate, filter, and select the objects you need. Click the Global Search box at the top or type slash (/) anywhere to start your search.
-
Click the Recover icon at the top to open the New Recovery form. By default, the Latest snapshot is pre-selected for recovery. If you need to recover from an earlier snapshot, click the Edit (pencil) icon to choose the desired snapshot. The icon(s) displayed under Location indicates the snapshot type(s) available (AWS snapshot and/or Cohesity snapshot) for recovery. Choose a snapshot type and click its icon to proceed with the recovery task:
-
Click Select Recovery Point.
-
Click Next: Recover Options to return to the form.
To recover from a Cohesity snapshot, you need an AWS SaaS Connection deployed in the target AWS region.
-
-
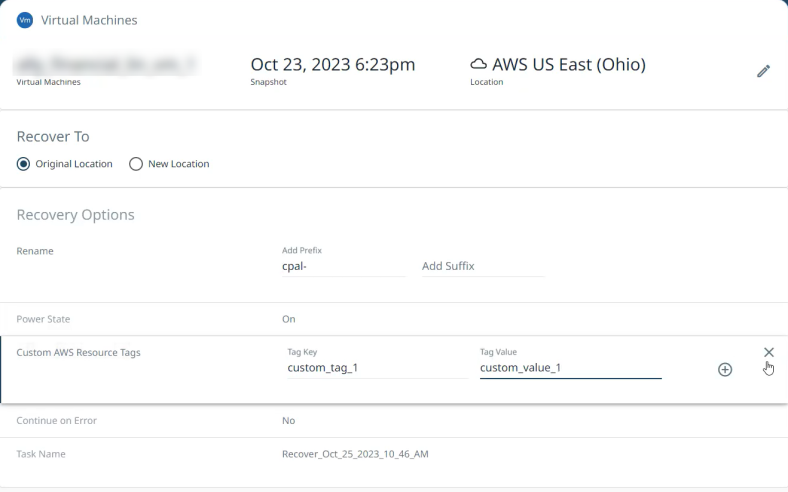
Under Recover To, select Original Location.
-
Select your Recovery Options:
-
Rename: Add a Prefix and/or Suffix to the recovered Amazon EC2 instances.
-
Power State: Disable Power On if you want the recovered Amazon EC2 instances to remain powered off after they are created.
-
Custom AWS Resource Tags: Add your custom AWS tag for the Amazon EC2 instance that will be recovered by specifying the Tag Key and Tag Value for the new custom tag. You can add multiple tags by clicking the add icon. These new tags will be attached to the recovered Amazon EC2 instance along with the existing tags.
If you provide a new Tag Value for an existing tag, the recovered Amazon EC2 instance will have this tag attached to the new Tag Value.
AWS allows you to add up to 50 tags to an AWS resource. When Cohesity recovers data, it adds 2 tags to the resource. If the number of custom and existing tags exceeds 48, the custom tags will override the existing tags. In this case, Cohesity will randomly discard some of the existing tags to accommodate the custom tags.
-
Continue on Error: Enable this option if you want to continue the recovery even if one of the objects encounters an error. By default, this option is disabled and the recovery operation will fail if one of the objects encounters an error.
-
Task Name: Change the default name of the recovery task.
-
-
Click Recover.
Cohesity Cloud Protection Service begins to restore the selected Amazon EC2 instances.
Recover Amazon EC2s to New Location
To recover your protected Amazon EC2 instances to a new location:
-
In Cloud Protection Service, navigate to Sources.
-
Click the Source name.
-
Select Show All > Protected.
-
Use the filters, search box, and views to locate and select the Amazon EC2 instances you want to recover.
You can also use Global Search to locate, filter, and select the objects you need. Click the Global Search box at the top or type slash (/) anywhere to start your search.
-
Click the Recover icon at the top to open the New Recovery form. By default, the Latest snapshot is pre-selected for recovery. If you need to recover from an earlier snapshot, click the Edit (pencil) icon to choose the desired snapshot. The icon(s) displayed under Location indicates the snapshot type(s) available (AWS snapshot and/or Cohesity snapshot) for recovery. Choose a snapshot type and click its icon to proceed with the recovery task:
-
Click Select Recovery Point.
-
Click Next: Recover Options to return to the form.
To recover from a Cohesity snapshot, you need an AWS SaaS Connection deployed in the target AWS region.
-
-
Under Recover To, select New Location and provide:
-
Source. Select a registered AWS account as the new recovery destination.
-
Region. Select a destination AWS region.
-
Key Pair. Select an AWS key pair to be associated with the recovered Amazon EC2 Instance(s).
-
Encryption Settings: Toggle on and provide the following details to encrypt the Amazon EC2 instance(s) to be recovered.
-
KMS Key Location: From the drop-down, select whether you want to use the KMS key from the Same AWS Account where you are recovering to or from a Different AWS Account.
-
KMS Key: If you are using the KMS key from the Same AWS Account, then from the drop-down, select the KMS Key. If you are using the KMS key from a Different AWS Account, then enter the KMS Key ARN in the following format:
arn:<partition>:kms:<region>:<account-id>:key/<key-id>
If Encryption Settings is enabled, all disks of Amazon EC2 will be encrypted with the provided key.
By default, this option is disabled.
-
For Cohesity snapshot recovery with Encryption Settings disabled, the recovered Amazon EC2 instances will remain unencrypted irrespective of its encryption status before recovery.
-
For AWS snapshot recovery with Encryption Settings disabled, the Amazon EC2 instance will be recovered with the default AWS KMS encryption key of the destination region.
-
-
Subnet. Select the subnet where the recovered Amazon EC2 Instance(s) will be launched.
-
Network Security Group. Select the network security group to be associated with the recovered Amazon EC2 Instance(s).
-
-
Select your Recovery Options:
-
Rename: Add a Prefix and/or Suffix to the recovered Amazon EC2 instances.
-
Power State: Disable Power On if you want the recovered Amazon EC2 instances to remain powered off after they are created.
-
Custom AWS Resource Tags: Add your custom AWS tag for the Amazon EC2 instance that will be recovered by specifying the Tag Key and Tag Value for the new custom tag. You can add multiple tags by clicking the add icon. These new tags will be attached to the recovered Amazon EC2 instance along with the existing tags.
If you provide a new Tag Value for an existing tag, the recovered Amazon EC2 instance will have this tag attached to the new Tag Value.
AWS allows you to add up to 50 tags to an AWS resource. When Cohesity recovers data, it adds 2 tags to the resource. If the number of custom and existing tags exceeds 48, the custom tags will override the existing tags. In this case, Cohesity will randomly discard some of the existing tags to accommodate the custom tags.
-
Continue on Error: Enable this option if you want to continue the recovery even if one of the objects encounters an error. By default, this option is disabled and the recovery operation will fail if one of the objects encounters an error.
-
Task Name: Change the default name of the recovery task.
-
-
Click Recover.
Cohesity Cloud Protection Service begins to restore the selected Amazon EC2 instances.
Amazon EC2 Recovery Support Matrix
| Backup Type | Data Source | Recovery to Same AWS account, same AWS region | Recovery to same AWS account, different AWS region | Recovery to a diff AWS account, same AWS Region | Recovery to a diff AWS account, different AWS Region |
|---|---|---|---|---|---|
|
AWS Snapshot |
Encrypted |
Supported |
Supported |
Supported |
Supported |
|
AWS Snapshot |
Non-Encrypted |
Supported |
Supported |
Supported |
Supported |
|
Cohesity Snapshot |
Encrypted |
Supported |
Supported |
Supported |
Supported |
|
Cohesity Snapshot |
Non-Encrypted |
Supported |
Supported |
Supported |
Supported |
Important Considerations
For recovery to:
-
Same AWS Account, same AWS Region: No prerequisites.
-
Different AWS Account, same AWS Region:
-
Target AWS account should be registered as a data source in the same destination cloud region.
-
If you have enabled Encryption Settings for an Amazon EC2 instance that is already encrypted, then the Amazon EC2 instance will be recovered with the encryption provided in the Encryption Settings.
-
Additional limitations for AWS snapshot recovery:
-
AWS KMS encryption key should be shared from the source AWS account to the target AWS account before the recovery is attempted.
-
If the source Amazon EC2 instances were encrypted with the default AWS KMS encryption key, their recovery to a different AWS account will fail. (AWS limitation).
-
You cannot unencrypt an Amazon EC2 instance that is already encrypted. That is, if you have configured to recover an encrypted Amazon EC2 instance with the Encryption Settings option disabled, then the Amazon EC2 instance will be recovered with the default AWS KMS encryption key of the destination region.
-
-
-
Different AWS Account, different AWS Region:
-
Target AWS account should be registered as a data source in the same destination cloud region.
-
If you have enabled Encryption Settings for an Amazon EC2 instance that is already encrypted, then the Amazon EC2 instance will be recovered with the encryption provided in the Encryption Settings.
-
Additional limitations for AWS snapshot recovery:
-
AWS KMS encryption key should be shared from the source AWS account to the target AWS account before the recovery is attempted.
-
If the source Amazon EC2 instances were encrypted with the default AWS KMS encryption key, their recovery to a different AWS account will fail. (AWS limitation).
-
You cannot unencrypt an Amazon EC2 instance that is already encrypted. That is, if you have configured to recover an encrypted Amazon EC2 instance with the Encryption Settings option disabled, then the Amazon EC2 instance will be recovered with the default AWS KMS encryption key of the destination region.
-
-
