Recover Microsoft SQL Server Databases
After you protect your Microsoft SQL Server databases, you can recover them from Cohesity Cloud Protection Service, to their original or a new location.
To recover protected Microsoft SQL Server databases:
-
In Cloud Protection Service, go to Sources to set up your recovery task.
-
Click on the Source name.
-
Above the tree, select Show All > Protected.
-
Use the filters, search box, and views to locate and select the SQL databases you need including MS MSQL standalone, FCI, and AG.
You can also use Global Search to locate, filter, and select the objects you need. Click the Global Search box at the top or type slash (/) anywhere to start your search.
-
Click Recover at the top to open the New Recovery form with the Latest snapshot (protection run).
If you need to recover from an earlier snapshot, click the Edit icon to open the Recovery Point calendar. Click List to view the available recovery points by timestamp and click one.
-
Click Select Recovery Point.
-
Click Next: Recover Options to return to the form.
-
-
Under Targets, select Recover as a new Database, Overwrite Original Database. If you choose:
-
Recover as a new Database, select a registered Microsoft SQL Server Instance or Restore to Original SQL Server Instance.
-
Overwrite Original Database, Cohesity will overwrite the original SQL Server instance. Note that this is a destructive action that cannot be undone.
-
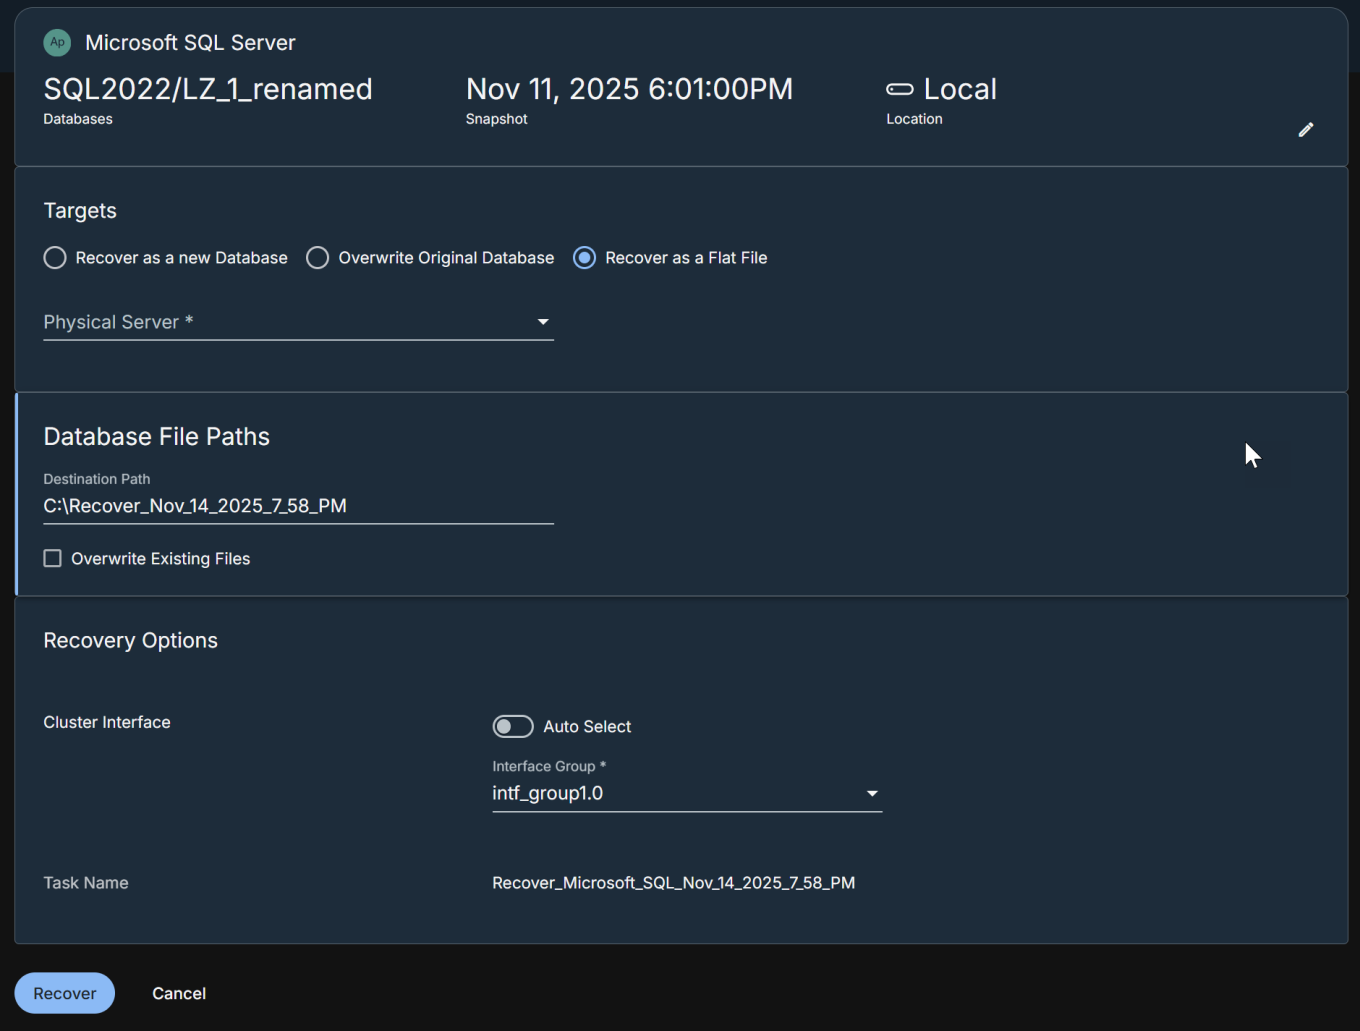
Recover as Flat File, the SQL database backup files will be recovered to the specified location, rather than as a database.
For more information, see Recover as Flat File.
This is applicable only for the SQL Servers backed up using file-based and VDI-based backup and not applicable for volume-based backup.
-
-
If necessary, under Database File Paths, you can:
-
Update the Database Files and Log Files paths.
-
Enter additional File Path Rules.
-
-
Select your Recovery Options:
-
Rename. Choose whether to Bulk Rename with a Suffix or Rename Individual Objects.
-
WITH RECOVERY: By default, a Microsoft SQL Server restore WITH RECOVERY is performed. You can optionally toggle this off to perform a restore WITH NORECOVERY.
-
Keep CDC: Use this option to restore a backed-up database with the change data capture (CDC) enabled. By default, the Keep CDC switch is ON. If the backed-up database is not CDC enabled and the user tries to restore it with Keep CDC, the database will be restored without CDC.
-
Overwrite Alternate Database: Enable this option to recover the database by overwriting the existing database.
-
WITH Clause for Full/Incremental Restore: Specify the WITH clause that you want to use for the full/ incremental recovery.
-
WITH Clause for Log Restore: Specify the WITH clause that you want to use for the log recovery.
-
Capture Tail Logs: You can optionally choose to Capture tail logs. Tail logs capture records that have not yet been backed up. They are captured to ensure all transactions are backed up before restoring the database.
-
Task Name. Change the default name of the recovery task.
-
Replay Entire Last Log: Enable this option to replay the entire last log backup for the specified point in time without using the STOPAT option.
-
-
Click Start Recovery.
Recover as Flat File
Cohesity allows you to recover the SQL database backup files to the specified location on the target host, rather than as a database. This provides flexibility for self-service recovery where direct access to the backup files is required.
The backup files are recovered to a subdirectory in the specified destination path, with the following file name format:
<OriginalHostName>_<OriginalInstanceName>_<OriginalDatabaseName>
For example, the backup files are recovered to C:\RestoreDir\SQLHost01_MSSQLSERVER_AdventureWorks\
where,
-
C:\RestoreDir\ is the destination path,
-
SQLHost01 is the host,
-
MSSQLSERVER is the instance,
-
AdventureWorks is the database.
This is applicable only for the SQL Servers backed up using file-based and VDI-based backup and not applicable for volume-based backup.
When you recover databases as flat files, the following backup files are recovered based on the backup method and recovery point:
| Backup Type | Recovery Point | Recovered Files |
|---|---|---|
| File-Based | Incremental Backup | Database files - .mdf, .ldf., .ndf, VSS metadata |
| Point In Time |
Database files - .mdf, .ldf., ndf, VSS metadata Log backup files - .trn |
|
| VDI | Incremental Backup |
Full backup file - .bak Differential backup file - .bak |
| Point In Time |
Full backup files - .bak Differential backup files - .bak Log backup files - .trn |
To recover SQL Server databases as flat files:
-
Navigate to the New Recovery page in the Cohesity cluster.
-
Choose the Targets as Recover as Flat File.
-
Provide the following details:
-
Physical Server: Windows server where the agent is installed and registered to the cluster.
-
Database File Path: Destination path in the physical server where the flat files will be recovered.
-
Overwrite Existing Files: Select to overwrite the existing files in the destination path. This is a destructive action and cannot be reverted.
Under Recovery Options:
-
Cluster Interface: By default, the Auto Select option is enabled, and the recovery task automatically selects the correct VLAN. If you disable this option, then select a configured interface group from the Interface Group drop-down.
-
Task Name: Change the default name of the recovery task.

-
-
Click Recover.
