Recover Azure Virtual Machines
After you protect your Azure VMs, you can recover them to their original location or a new location using
Since Azure is fully deprecating support for unmanaged disks, Cohesity will now recover unmanaged disks as managed disks.
Recover Azure VMs to Original Location
To recover your protected Azure VMs its original location:
-
In Cloud Protection Service, navigate to Sources.
-
Click the Source name.
-
Select Protection Status > Protected.
-
Use the filters, search box, and views to locate and select the Azure VMs you want to recover.
You can also use Global Search to locate, filter, and select the objects you need. Click the Global Search box at the top or type slash (/) anywhere to start your search.
-
Click the Recover icon at the top to open the New Recovery form. By default, the latest snapshot is pre-selected for recovery. If you need to recover from an earlier snapshot, click the Edit (pencil) icon to choose the desired snapshot, and then click Select Recovery Point.
-
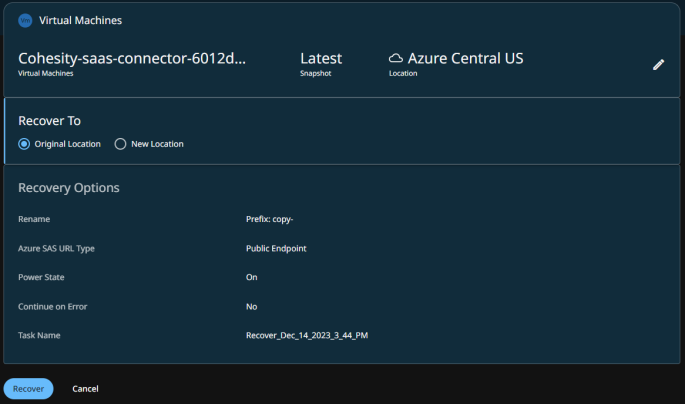
Under Recover To, select Original Location.
-
Select the availability set to which the VM has to be recovered. For more information, see Azure Availability Sets.
-
Select your Recovery Options:
-
Rename: Add a Prefix and/or Suffix to the recovered Azure VMs.
-
Azure SAS URL Type: For recovering Azure VMs, Cohesity uses the snapshots of Azure-managed disks that are accessible through SAS URLs. Select one of the following endpoint options to access data from the SAS URL:
-
Public Endpoint: Select this option to access snapshots over a public network.
-
Private Endpoint: Select this option to access snapshots using a private IP address from your virtual network. You can either use the same SAS URL details as protection or enable the Use custom defined VNET and Subscription and Region in Private Endpoint option, click Configure Network Details for Private Endpoints, and provide the following details for configuring the private endpoint:
-
Virtual Network: Select a virtual network in Azure. Ensure the virtual network of the SaaS connector and the private endpoint is the same.
-
Subnet: Select a subnet of the virtual network.
If you have selected VMs from multiple regions, then you must select at least one virtual network and subnet per region.
Cohesity recommends using dedicated subnets for the Azure SAS URL endpoint.
-
-
-
Power State: Disable Power On if you want the recovered VMs to remain powered off after they are created.
-
Continue on Error: Enable this option if you want to continue the recovery even if one of the objects encounters an error. By default, this option is disabled and the recovery operation will fail if one of the objects encounters an error.
-
-
Task Name: Change the default name of the recovery task.

-
Click Recover.
Cohesity Cloud Protection Service opens the Activity page, showing your file recovery task as it runs, along with the recovery progress on the right.
Recover Azure VMs to New Location
To recover your protected Azure VMs to a new location:
-
In Cloud Protection Service, navigate to Sources.
-
Click the Source name.
-
Select Protection Status > Protected.
-
Use the filters, search box, and views to locate and select the Azure VMs you want to recover.
You can also use Global Search to locate, filter, and select the objects you need. Click the Global Search box at the top or type slash (/) anywhere to start your search.
-
Click the Recover icon at the top to open the New Recovery form. By default, the latest snapshot is pre-selected for recovery. If you need to recover from an earlier snapshot, click the Edit (pencil) icon to choose the desired snapshot, and then click Select Recovery Point.
-
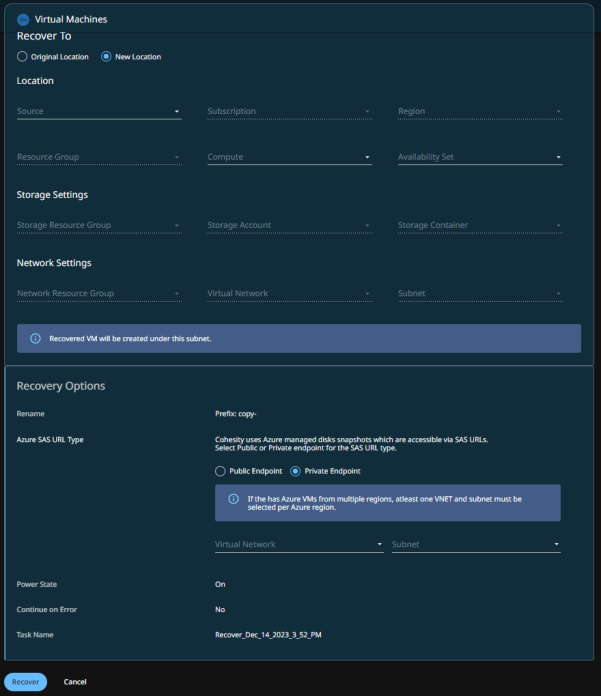
Under Recover To, select New Location, and provide the following information:
Location:
-
Source: Select a registered Azure source to recover the VMs to.
-
Subscription: Select the subscription for the VMs selected for recovery.
-
Region: Select a destination Azure region.
-
Resource Group: Select a resource group to which the restored Azure VM will belong.
-
Compute: Select the VM size type, such as
Standard_D1, to use when recovering the VMs. Ensure that the chosen VM size is available in the destination Azure region. -
Availability Set: Select the availability set to which the VM has to be recovered. For more information, see Azure Availability Sets.
Storage Settings:
-
Storage Resource Group: Select the resource group for the storage account. Ensure that the resource group you select for the storage account is in the same region as the resource group chosen for restoring the Azure VM.
-
Storage Account: Select the Storage Account to which the recovery has to be done. The storage account you select must be in the same region as the resource group. Any storage account not in the same region as the parent resource group will not be displayed as an option in the recovery workflow.
-
Storage Container: Select the storage container in which page blobs will be created.
Network Settings:
-
Network Resource Group:Select the resource group for the virtual network. Ensure that the resource group you select for the virtual network is in the same region as the resource group chosen for restoring the Azure VM.
-
Virtual Network: Select the virtual network where the restored VM must be placed.
-
Subnet: Subnets in the virtual network where restored VMs must be placed.
-
-
Select your Recovery Options:
-
Rename: Add a Prefix and/or Suffix to the recovered Azure VMs.
-
Azure SAS URL Type: For recovering Azure VMs, Cohesity uses the snapshots of Azure-managed disks that are accessible through SAS URLs. Select one of the following endpoint options to access data from the SAS URL:
-
Public Endpoint: Select this option to access snapshots over a public network.
-
Private Endpoint: Select this option to access snapshots using a private IP address from your virtual network. You can either use the same SAS URL details as protection or enable the Use custom defined VNET and Subscription and Region in Private Endpoint option, click Configure Network Details for Private Endpoints link, and provide the following details for configuring the private endpoint:
-
Virtual Network: Select a virtual network in Azure. Ensure the virtual network of the SaaS connector and the private endpoint is the same.
-
Subnet: Select a subnet of the virtual network.
If you have selected VMs from multiple regions, then you must select at least one virtual network and subnet per region.
Cohesity recommends using dedicated subnets for the Azure SAS URL endpoint.
-
-
-
Power State: Disable Power On if you want the recovered VMs to remain powered off after they are created.
-
Continue on Error: Enable this option if you want to continue the recovery even if one of the objects encounters an error. By default, this option is disabled and the recovery operation will fail if one of the objects encounters an error.
-
Task Name: Change the default name of the recovery task.

-
-
Click Recover.
