Register Custom App in Microsoft Entra ID
To get started, you'll register a custom app below to add the necessary permissions.
Go to the Azure portal, register a new app, add the permissions, and capture the App ID and Access Key. For more on registering and configuring apps in Microsoft Entra ID, see Register an application with the Microsoft identity platform and Configure a client application to access a web API in the Microsoft documentation.
Make sure that you make note of the App ID and Access Key while registering the app. You'll need them to register your Microsoft 365 domain as a source in Cloud Protection Service.
To register your custom app for Cloud Protection Service:
-
Open Microsoft Entra ID
-
To manage Microsoft Entra ID using the Azure Portal:
-
Log in to the Azure portal with your Microsoft 365 administrator user credentials.
-
Click the main menu (≡) in the top left corner and select Microsoft Entra ID.
-
-
To manage Microsoft Entra ID using Microsoft 365:
-
Log in to Microsoft 365.
-
On the Microsoft 365 page, click Admin.
-
On the Microsoft 365 admin center page, select Admin centers and then click Microsoft Entra.
-
-
-
Create a new custom app.
-
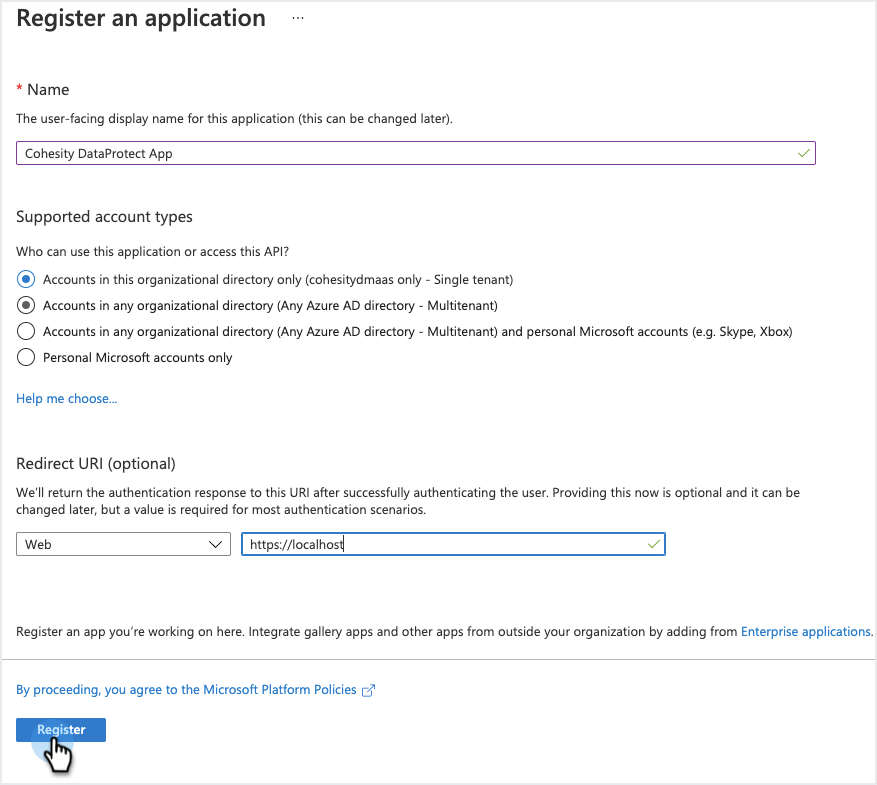
Under the Manage section, select App Registrations, then click New Registration. In the Register an application page:
-
Enter a Name for your app.
-
Select the Supported account types that can access the app,
-
In the Redirect URI drop-down, select Web and enter
https://localhost. -
Click Register.
-
-
-
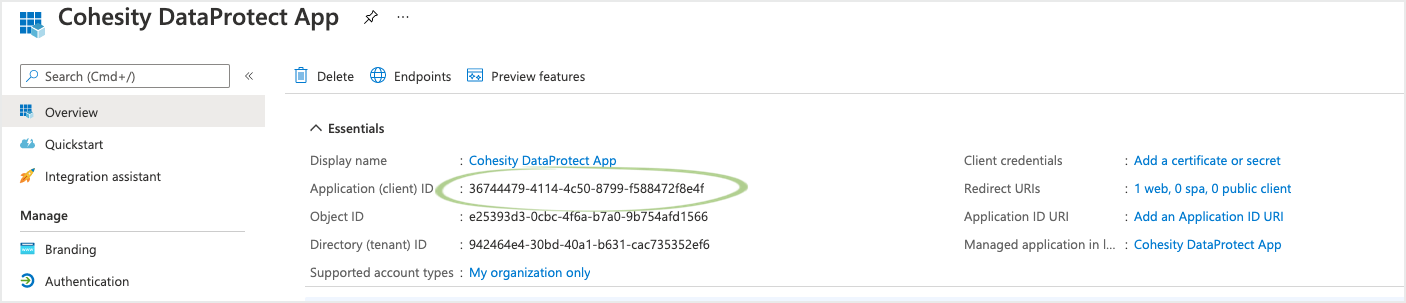
After the custom app has been created, click Overview and copy the Application (client) ID. You need to use Application (client) ID to register Microsoft 365 as a source in Cloud Protection Service.
-
Add API permissions to the custom app:
-
Add Oauth API permission if the Microsoft 365 source tenant has OAuth enabled for secure communication:
-
Under the Manage section, select App Registrations and click Add a permission.
-
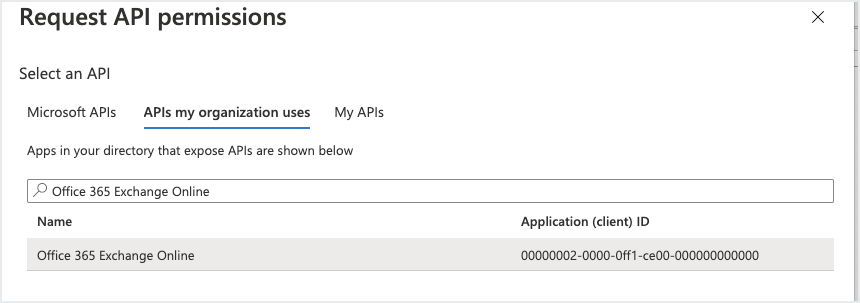
In the Request API permissions page, click the APIs my organization uses tab.
-
In the search bar, enter Office 365 Exchange Online then click the API. (Use the complete app name.)
-
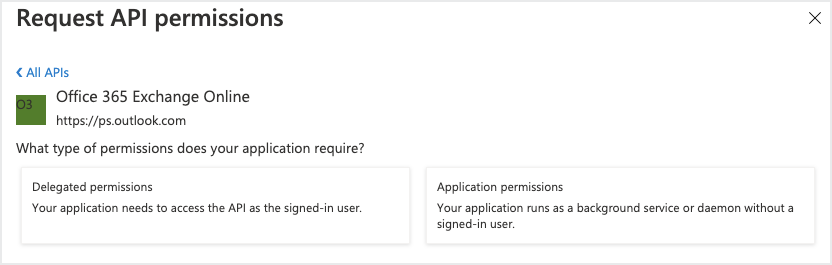
In the Office 365 Exchange Online API, click Application Permissions.
-
Under Other Permissions, select
full_access_as_appto enable OAuth and click Add Permissions.App Permissions Permission Type full_access_as_app Application 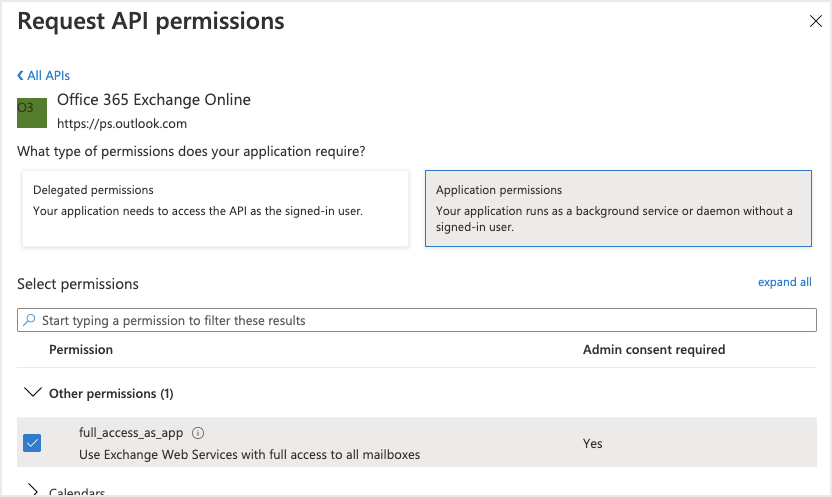
-
-
-
Add Graph API permissions:
-
Under the Manage section, select App Registrations, and then click Add a permission.
-
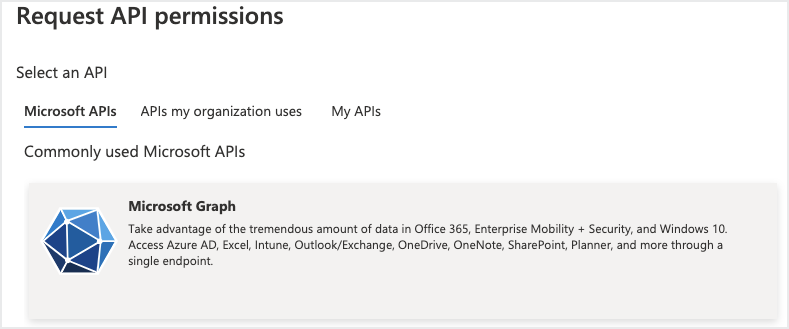
In the Request API permissions page, select Microsoft Graph API.
-
Click Application Permissions and add the permissions listed below for your Microsoft 365 application.
App Permissions Permission Type Mailboxes OneDrive SharePoint Online Sites MS Group MS Teams ChannelMember.ReadWrite.All Application N/A N/A N/A N/A 
Files.ReadWrite.All Application N/A
Group.ReadWrite.All Application N/A N/A N/A
Reports.Read.All Application
Sites.ReadWrite.All Application N/A
Sites.FullControl.All Application N/A
ChannelMessage.Read.All Application N/A N/A N/A N/A
Chat.Read.All Application
N/A N/A N/A N/A Mail.ReadWrite Application
N/A N/A N/A N/A MailboxSettings.Read Application
N/A N/A N/A N/A TeamsAppInstallation.ReadForChat.All Application
N/A N/A N/A N/A Organization.Read.All Application
Application.ReadWrite.OwnedBy Application
Application.Read.All Application
User.Read.All Application
-
Click Add permissions.
-
-
Add SharePoint permissions to the custom app:
-
Under the Manage section, select App Registrations and click Add a permission.
-
In the Request API permissions page, select SharePoint. (If you don't see it, scroll further down.)
-
Click Delegated Permissions and add the permissions listed below, then click Add permissions.
-
Click Application Permissions and add the permissions listed below, then click Add permissions.
Permission Type Permissions Name Delegated AllSites.FullControl AllSites.Manage User.ReadWrite.All MyFiles.Read MyFiles.Write Sites.Search.All TermStore.ReadWrite.All Application Sites.FullControl.All Sites.Manage.All Sites.ReadWrite.All TermStore.ReadWrite.All User.ReadWrite.All
-
-
-
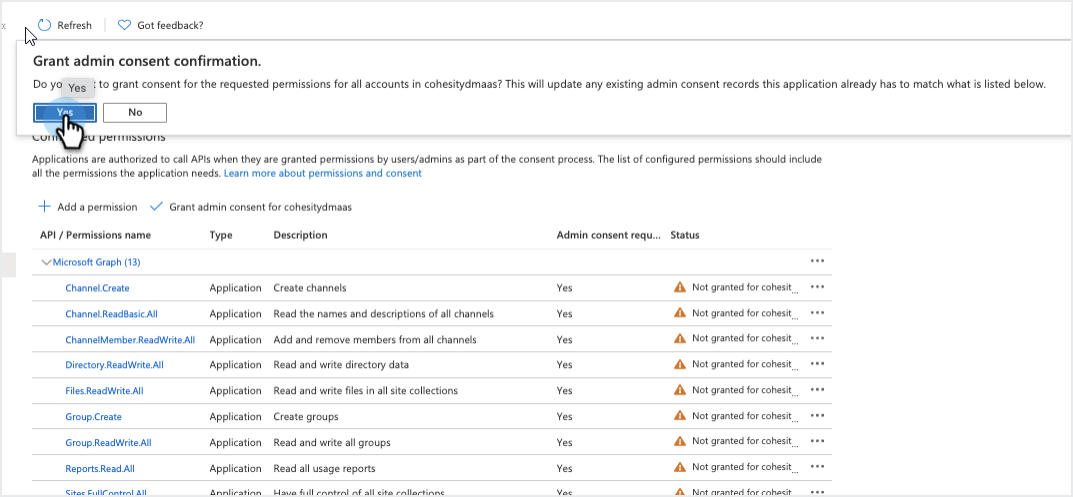
Grant admin consent for the API permissions.
-
Under Configured permissions, click Grant admin consent.
-
On the Grant admin consent confirmation, click Yes.
-
-
Create a new client secret that will be used to register Microsoft 365 as a source in Cloud Protection Service.
-
Under the Manage section, select Certificates & secrets.
-
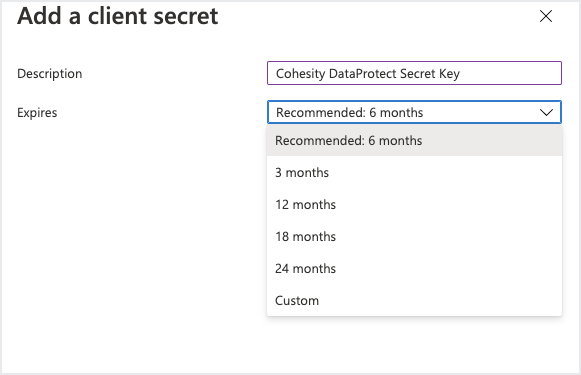
In the Client secrets section, click New client secret. Enter a Description.
-
In the Expires drop-down, select how long the secret key will be valid.
-
Click Add.
-
-
Under Client secrets, click the Copy button next to the string under VALUE. You need the Value key of the client secret to register Microsoft 365 as a source in Cloud Protection Service.
-
Store the Value key in a secure location. After you exit this page, you will not be able to see the Value key again. If you lose your value key, you will need to create a new client secret.

-
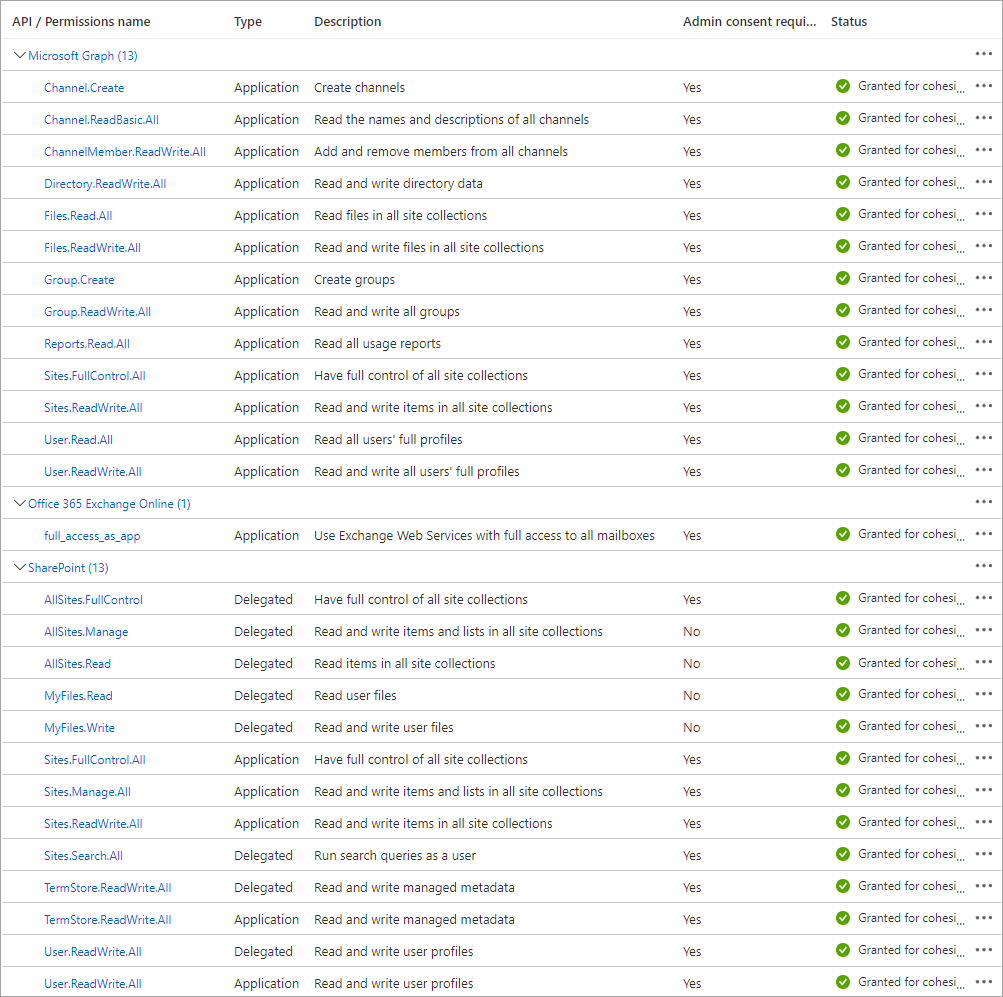
When you finish, your custom app should include the permissions as shown below:
Permission descriptions
The purpose to grant the application permissions is described as follows:
| App Permissions | API Type | Permission Type | Purpose |
|---|---|---|---|
| Application.Read.All | Graph | Application | Read all applications and service principals. |
| Application.ReadWrite.OwnedBy | Graph | Application | Used for rotation of certificates. |
| ChannelMember.ReadWrite.All | Graph | Application | Add and remove members from channels. |
| ChannelMessage.Read.All | Graph | Application | Read all channels chat messages. |
| Chat.Read.All | Graph | Application | Read all users chat messages. |
| Files.ReadWrite.All | Graph | Application | Backup and recover the OneDrive for Business files. |
| Group.ReadWrite.All | Graph | Application | Create groups, read all group properties and memberships, and update group properties and memberships. |
| MailboxSettings.Read | Graph | Application | Read mailbox type. |
| Organization.Read.All | Graph | Application | Read the organization and related resources. Related resources include things like subscribed skus and tenant branding information. |
| Reports.Read.All | Graph | Application | Read all usage reports. |
| Sites.FullControl.All | Graph | Application | Used to avoid resync error in getting incremental changes. |
| Sites.ReadWrite.All | Graph | Application | Create, read, update, and delete documents and list items in all site collections. |
| TeamsAppInstallation.ReadForChat.All | Graph | Application | Read installed teams apps for all user chats, for example, this allows identifying apps/bots in messaging. |
| User.Read.All | Graph | Application | Read full profiles of all users. |
| full_access_as_app | Exchange | Application | Use Exchange Web Services with full access to all mailboxes. |
| AllSites.FullControl | SharePoint | Delegated | Have full control of all site collections. |
| AllSites.Manage | SharePoint | Delegated | Read and write items and lists in all site collections. |
| MyFiles.Read | SharePoint | Delegated | Read user files. |
| MyFiles.Write | SharePoint | Delegated | Read and write user files. |
| Sites.FullControl.All | SharePoint | Application | Have full control of all site collections. |
| Sites.Manage.All | SharePoint | Application | Read and write items and lists in all site collections. |
| Sites.ReadWrite.All | SharePoint | Application | Read and write items in all site collections. |
| Sites.Search.All | SharePoint | Delegated | Run search queries as a user. |
| TermStore.ReadWrite.All | SharePoint | Application | Read and write managed metadata. |
| TermStore.ReadWrite.All | SharePoint | Delegated | Read and write managed metadata. |
| User.ReadWrite.All | SharePoint | Application | Read and write user profiles. |
| User.ReadWrite.All | SharePoint | Delegated | Read and write user profiles. |
