Configure SSO with Okta
This topic provides step-by-step instructions on adding Cohesity Cloud Protection Service as an application to Okta.
Perform the following steps to add Cohesity Cloud Protection Service as an application to Okta:
-
Log in to Okta as an Okta administrator.
-
Navigate to Applications > Applications and click Create App Integration.
The Create a New Application Integration page is displayed.

-
For the Sign on method, select SAML 2.0 and click Next.
The Create SAML Integration page is displayed.
-
Click the General tab and for General Settings do the following:
-
App Name: Specify an app name of your choice to display in the Cohesity Cloud Protection Service tile on the SSO page.
-
App logo (optional): Click
> Browse files and navigate to the location of the logo and select the logo. Click Apply to upload the logo. Click
to delete the logo.
-
App Visibility: Leave the default settings for Do not display application icon for users and Do not display application icon in the Okta Mobile app.
-
Click Next.

-
-
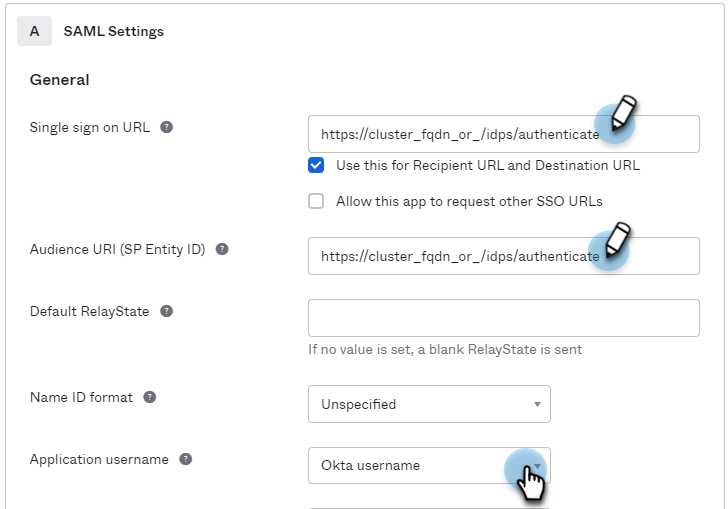
Click the Configure SAML tab and for SAML Settings do the following:
-
Single sign on URL: Specify the application URL followed by
/idps/authenticate.For example:
https://<cluster_fqdn>/idps/authenticate.For Helios use,
https://helios.cohesity.com/v2/mcm/idp/authenticate.To find the FQDN and VIP address, log in to Cohesity Data Cloud (Self-managed) and navigate to Settings > Cluster > Networking > VIPs.
The Use this for Recipient URL and Destination URL check box is selected by default.
-
Audience URI (SP Entity ID): Specify the same URL as above.
-
Application username: Select your preference.

-
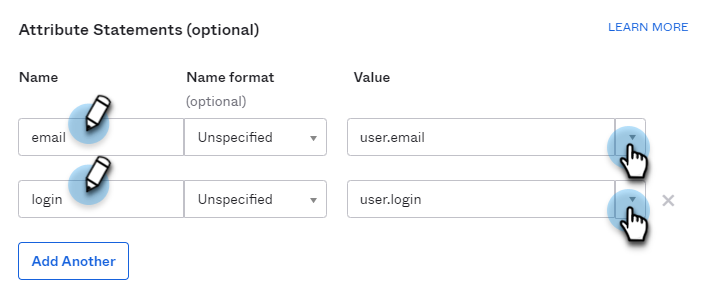
Under Attribute Statements, map the Email and/or Login SAML attributes to the Okta user profile attributes. If the value is not available in the drop-down list, type it as shown in the table. You can map either or both attributes.
SAML Attribute
Okta User Profile Attribute Value
Email
user.email
Login
user.login

-
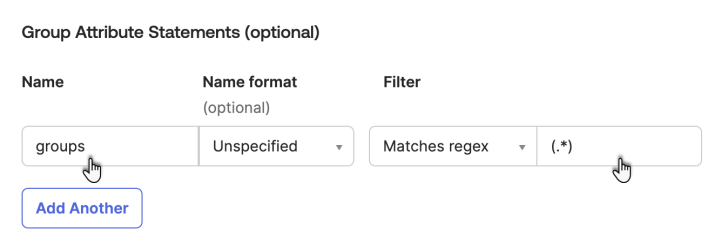
Under Group Attribute Statements (Optional), map the groups attribute to the Okta Filter attribute. (For example, select Starts with and enter cohesity_ to pass any group name that starts with
‘cohesity_’to Cohesity.) If you want to use an existing group, use a regex to pass all groups.You should enter "groups" in the name field to map the groups attribute to the Okta Filter attribute.

-
Click Next.
-
Click Finish to add the application.
-
-
Click the Sign On tab and do the following:
-
Under SAML Setup, located at the right side, click View SAML setup instructions.
The How to Configure SAML 2.0 for <application name> page is displayed.

-
Copy the Identity Provider Single Sign On URL and save it for later use. You will use this URL to enter the Cohesity Single Sign-On URL when you Configure SSO to Cohesity.
A sample URL is shown below.
https://mycompany.okta.com/app/cohesitymycompany_heliosapp/exkhhbyzrgu0YvJFk0h7/sso/saml -
Copy the Identity Provider Issuer and save it for later use. You will use this URL to enter the Cohesity Provider Issuer ID when you Configure SSO to Cohesity.
A sample URL is shown below.
http://okta.com/exkhhbyzrgu0YvJFk0h7 -
Click Download certificate to download the
okta.certfile and note its download location. -
Convert the downloaded
okta.certfile tookta.pem. You will upload this file to Cohesity Cloud Protection Service later.
-
-
Click the Assignments tab and do the following:
-
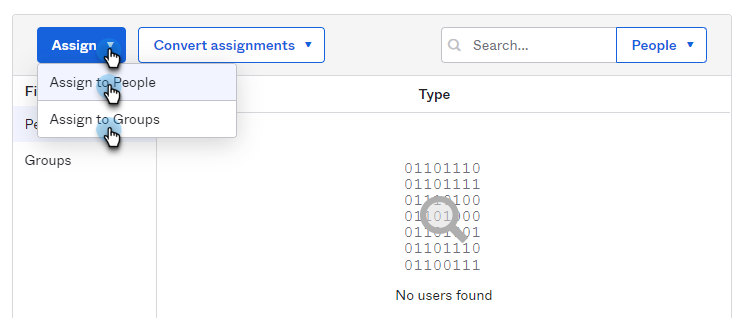
From the Assign drop-down, select Assign to People to assign users to your Cohesity Okta application.
-
From the Assign drop-down, select Assign to Groups to assign groups to the app.

-
You have now configured the Okta application for Cohesity. You need to add the SSO provider in Cohesity Cloud Protection Service. For more information, see Configure SSO .
