Add a Single Sign-on Provider
You can now configure Cohesity Cloud Protection Service to use an Identity Provider (IdP), such as Okta, for single sign-on (SSO) access. Cohesity Cloud Protection Service must be added as an application to your IdP such as Okta. The SSO must then be configured along with the SSO URL and certificate file in Cohesity Cloud Protection Service. After the integration, users can sign in to Cohesity Cloud Protection Service using either the IdP sign in page or sign in with the SSO link in the Cohesity Cloud Protection Service login page.
The following identity providers are supported:
|
Identity Provider |
Documentation Link |
|---|---|
|
CyberArk Workforce Identity |
|
|
IBM Security Verify |
|
|
Duo Single Sign-on |
|
|
Ping Identity |
|
|
Okta Single Sign-on |
|
| JumpCloud | JumpCloud SSO |
| ManageEngine ADSelfService Plus | Configure SSO with ADSelfService Plus |
| Microsoft Entra ID | Configure SSO with Microsoft Entra ID |
| OneLogin | Configure SSO with OneLogin |
| RSA SecurID Access | Configure SSO with RSA SecurID Access |
| Thales SafeNet Trusted Access | Configure SSO with Thales SafeNet Trusted Access |
Configure SSO
To configure SSO:
- In Cloud Protection Service, navigate to Settings > Access Management > Single Sign-On.
- Click Configure SSO.
-
Select one of the following options:
-
SAML: Security Assertion Markup Language (SAML) is an XML-based protocol used for SSO login.
-
OpenID Connect: OpenID Connect is an open authentication protocol that uses OAuth2.0 framework.
OpenID Connect is supported only for API based authentication. It is not available for Single Sign-On (SSO) login through the UI.
-
- If you select SAML, then refer to the following table:
Name
Description
SSO Domain
Unique domain name that will differentiate this IdP from others. As Cohesity Cloud Protection Service supports multiple IdPs, this has to be a unique string (usually company domain). For a user to be redirected to this IdP, the user will need to log in via SSO using username@SSO_DOMAIN.
When a user logs in toCohesity Cloud Protection Service using SSO and enters the email address as foo@bar.com, Cohesity Cloud Protection Service looks for the IdP that has the SSO Domain configured as bar.com and redirects this user foo to the matching IdP. This is how Cohesity Cloud Protection Service determines which IdP the user needs to be forwarded to.
SSO Provider From the drop-down, select the SSO provider name of your choice. Select the I have read the SSO documentation provided by <SSO provider name> check box. Cohesity recommends reading the SSO documentation before proceeding to the next step. Assign to Organization Optional. In a multitenant-enabled cluster, you can configure SSO for an organization that has been added to the Cohesity cluster. Select an organization from the drop-down. Single Sign-on URL Paste the URL that you copied from your IdP. Provider Issuer ID Paste the issuer ID that you copied from your IdP. X.509 Certificate Click Select File and browse to the location to select the file that you downloaded and renamed previously. -
If you select OpenID Connect (OIDC), perform the following steps and then refer to the table:
Prerequisites:
-
Create the OIDC app within your Identity Provider (IdP). For more information, see Create OIDC app integrations.
OIDC is an open standard and Single-Sign On with Cohesity Cloud Protection Service is intended to work with any OpenID Connect supported Identity Provider. For setup details, refer to your Identity Provider's documentation.
-
Map the OIDC configuration details from Okta IDP to Cohesity Cloud Protection Service side configurations:
-
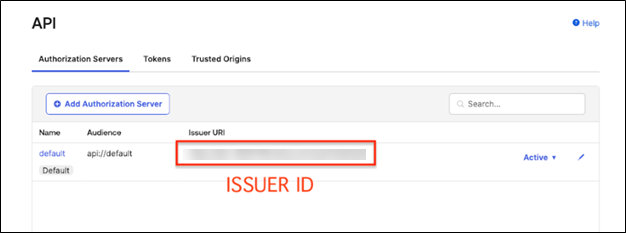
To get the Issuer ID:
-
Navigate to Security > API.
-
On the API page, click Authorization Servers.
You can find the issuer ID in the Issuer URI section.

-
-
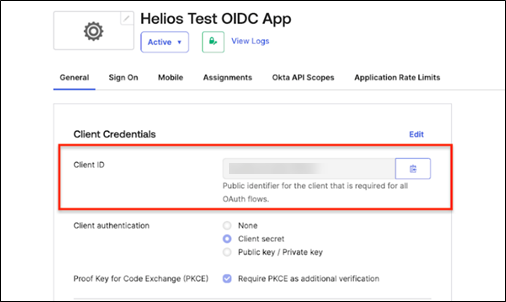
To get the Client ID:
-
Navigate to Applications.
-
On the Helios Test OIDC App page, click General.
You can find the Client ID in the Client Credentials window.

-
-
To generate the JSON Web Key Set (JWKS) URL:
-
Construct the URL as follows:
Format: <issuer ID>/.well-known/openid-configuration
For example:
https://***-00000000.okta.com/oauth2/default/.well-known/openid-configuration. -
Enter the constructed URL in the address bar of the browser and JSON output will be displayed.
-
-
Name
Description
OpenID Server Domain Enter a unique domain name. OpenID Server URL for the public (JWKS) Enter the JSON Web Key Set (JWKS) URL. You can get this URL from your identity provider. Client ID Enter the ID of the application created in the identity provider. Issuer ID Enter the Issuer ID URL. You can get the URL from your identity provider. Public Key Expiration (Seconds) Specifies the time in seconds before which Cohesity starts fetching for new public keys from the identity provider. The default value is 86400 seconds (24 hours). Public Key Refresh Interval (Seconds) Specifies the cache refresh interval in seconds to limit the requests to the OIDC server and also to refresh the public key, in case of token signature validation failure. The default value is 600 seconds (10 minutes). Token Validity (Seconds) Specifies the validity time in seconds for the token. The validity check is done only if the token is not expired. If it’s expired, then the 401 unauthorized or invalid token error is displayed. The default value is 15 minutes. -
-
Enter the following details:
Name
Description
Default Role for all SSO Users
Select a role to use as the default role for users signing on with SSO. Typically, you would select this option only during the initial SSO configuration. You can change this option later.
Access to All Clusters or Limited Clusters Select if the identity provider users can have access to all clusters or limited clusters. Sign Auth Request Optional. Enable this option if you want authorization requests to be signed with the Cohesity Cloud Protection Service public key. The Cohesity Cloud Protection Service public key must be uploaded to the IdP site.
When enabling signed requests in Okta (or any SAML identity provider), you must explicitly set the following values:
-
Signature Algorithm: RSA-SHA256
-
Digest Algorithm: SHA256
This option is not available if you select the OpenID Connect protocol.
Perform the following steps to obtain the Cohesity Cloud Protection Service public certificate:
-
Log in to Cohesity Cloud Protection Service.
-
Start a browser and enter https://helios.cohesity.com/v2/mcm/sslCertificate in the browser address bar.
-
Copy-paste the certificate to Notepad or Word Processor.
-
In the copied certificate, replace \n with a new line.
 Click to view a sample of the Cohesity Cloud Protection Service public certificate
-----BEGIN CERTIFICATE-----
MIIG1zCCBb+gAwIBAgIJAIuZz4iuB+NVMA0GCSqGSIb3DQEBCwUAMIG0MQswCQYD
VQQGEwJVUzEQMA4GA1UECBMHQXJpem9uYTETMBEGA1UEBxMKU2NvdHRzZGFsZTEa
MBgGA1UEChMRR29EYWRkeS5jb20sIEluYy4xLTArBgNVBAsTJGh0dHA6Ly9jZXJ0
cy5nb2RhZGR5LmNvbS9yZXBvc2l0b3J5LzEzMDEGA1UEAxMqR28gRGFkZHkgU2Vj
dXJlIENlcnRpZmljYXRlIEF1dGhvcml0eSAtIEcyMB4XDTIwMDcyOTIwMzYzNFoX
DTIyMDcyOTIwMzYzNFowRjEhMB8GA1UECxMYRG9tYWluIENvbnRyb2wgVmFsaWRh
dGVkMSEwHwYDVQQDExhoZWxpb3MtZGF0YS5jb2hlc2l0eS5jb20wggEiMA0GCSqG
SIb3DQEBAQUAA4IBDwAwggEKAoIBAQDSToInp3D+wBCvJuHfhQwfl8qFr2aWe5rA
tu6TV5udPCq+ORqC2UZ05HtLnv9NTXLJtISpH208fJmMBIsmQL6u6LgQ3bA7B3w5
q9e+Q/nsvDUS1MI0wjJsdVb96UZJHU4hRFeFm2seMB1jhscOOaWBdcP3wEaSum8O
oSqc7Gs1UGZImxJrNmC0ikCOH9kDK8qj9Bie05CQUM4nGhpzjr3zgGte1MvGBxji
GOOW/dW/qB5lmScndAoXMmzwytQVWxHasXRpYCawGEuG0+V4iGVJs14dSvKT8o4b
JOHFwXHcU8mesdfPvq9YTkH6TkYdl5S4WFYygR5rltwzDCc4NmH/AgMBAAGjggNX
MIIDUzAMBgNVHRMBAf8EAjAAMB0GA1UdJQQWMBQGCCsGAQUFBwMBBggrBgEFBQcD
AjAOBgNVHQ8BAf8EBAMCBaAwOAYDVR0fBDEwLzAtoCugKYYnaHR0cDovL2NybC5n
b2RhZGR5LmNvbS9nZGlnMnMxLTIxNjcuY3JsMF0GA1UdIARWMFQwSAYLYIZIAYb9
bQEHFwEwOTA3BggrBgEFBQcCARYraHR0cDovL2NlcnRpZmljYXRlcy5nb2RhZGR5
LmNvbS9yZXBvc2l0b3J5LzAIBgZngQw
-----END CERTIFICATE-----
-
Save the Notepad or Word Processor as .pem or .crt format.
-
The Cohesity Cloud Protection Service public key must be uploaded to the IdP site.
-
-
Click Save.
Cohesity Cloud Protection Service validates the connection to the IdP. If the connection succeeds, the SSO provider is added to the provider list and you can edit, delete or deactivate the provider. Users can start accessing Cohesity Cloud Protection Service through their IdP home page or the Cohesity Cloud Protection Service sign-in page by clicking the Sign in with SSO link.
Considerations
-
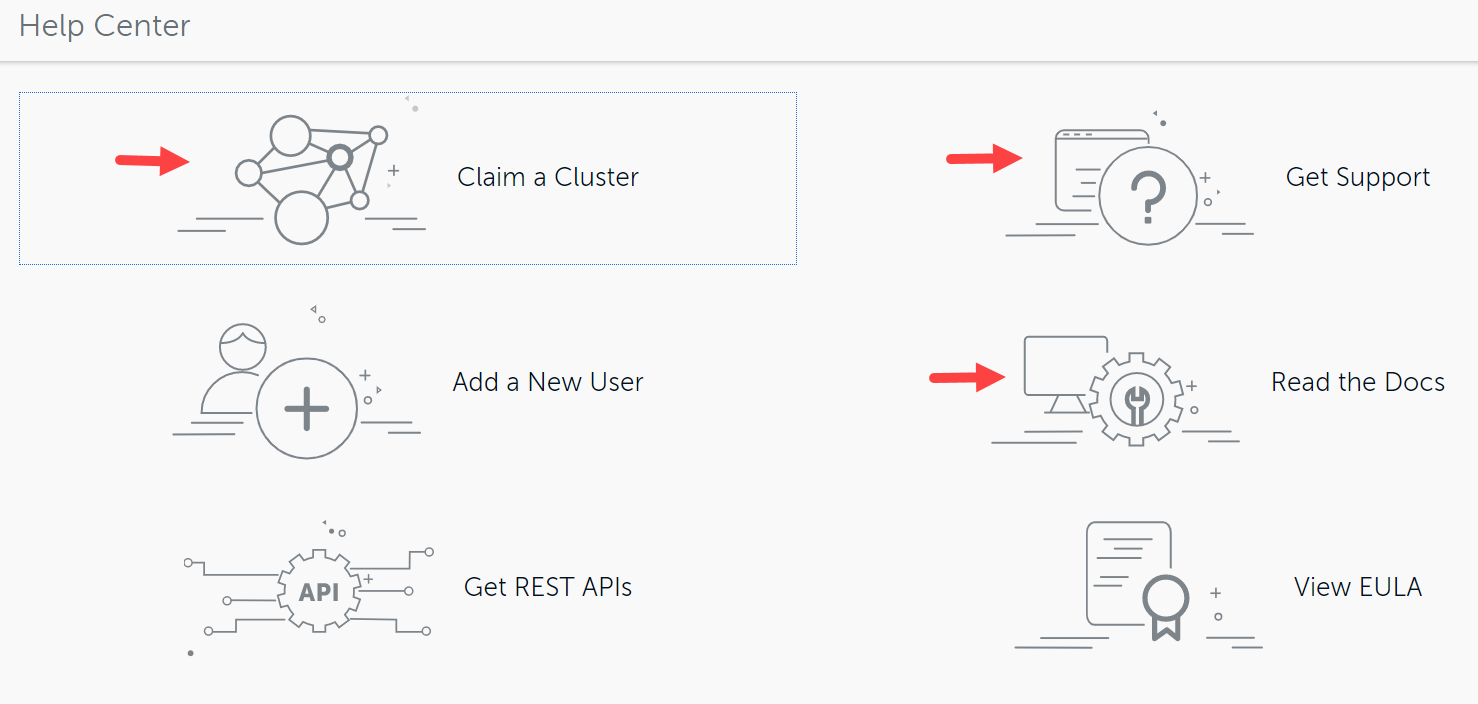
If you have logged into Cohesity Cloud Protection Service using Okta credentials (or any other IdP), you will not be able to directly access some of the portals in the Help Center such as Claim a Cluster, Get Support, and Read the Docs as these portals require Cohesity Support portal credentials to log in.

- If no default role is assigned to a user in the IdP entry, then such users will be rejected. Users will need to have an explicit entry.
- If the SAML assertions are to be signed and encrypted, then the Cohesity Cloud Protection Service certificate must be used.
Next > Add Cohesity Cloud Protection Service users and groups from your SSO domain.
